Showing posts with label Christmas. Show all posts

Monday, December 2, 2013

Monochromatic Christmas


Happy Monday and welcome to December! 
 
Today I wanted to share a couple of monochromatic cards that I created for classes and swaps this past month.  I LOVE the crispness of white and silver together.  I CASED this card from a similar card I found on Pinterest (I am not sure of the original creator).    It features the "Joyful Christmas" stamp set. 
 
The poinsettia is stamped on vellum (with versamark ink) and heat embossed with silver.  It also uses the beautiful frosted finishes embellishment for some extra sparkle.  I am going to create some more of these cards as well as a scrap page featuring this ideas as well.
 
My next project is a tag I created for a swap that I participate in with some fellow Canadian demonstrators.  I created the Christmas tree with Paper Lace Doilies. 
 
I added some sparkle with Dazzling Diamonds glitter (at this point in the Christmas season I think this stuff is just in the air in my house!  I can be sparkly without even crafting!)  The greeting is heat embossed with silver and I added a bit more sparkle with a punched star out of our silver glimmer paper.
 
 
I also embossed a little verse on the other side of the tag.  The finishing touch was the white organza ribbon.  I love the sheen of this ribbon with this tag. 
 
Thanks for stopping by today!

Friday, November 29, 2013

Vintage Santa

I just love working with this image of Santa! 
 
 
 Today's card has more of a vintage feel than the one I posted the other day (you can see it
here.)  I stamped Santa with Soft Suede ink on vanilla cardstock.  I sponged around him with crumb cake ink to "age" the paper.  I mounted it on a rectangular cherry cobbler mat to give the feel of the (very trendy) Polaroid look.  I also sponged the edges of the mat. 
 
I love the "Believe" sentiment from the Snowflake Soiree set-it just fits so well with the magic of the season and with Santa himself!  I added some burlap ribbon and a snowflake from the Festive Flurries set (and cut it with the Festive Flurries Framelits).  I finished it off with a pearl and some dazzling diamonds on the fur of Santa's coat.  It was a simple card to create and was pleased with how it turned out.  I hope you like him!
 
Thanks for stopping by!

Thursday, November 28, 2013

Clean and Simple Christmas

 
I love creating quick and beautiful cards for the holidays!  I always seem to need a few extras after I have created my main card and clean and simple are the way to go!  This one was CASED from the lovely Jenny Peterson.
 
For this card, I used the Endless Wishes photopolymer stamp set (now sold out :(  boo hoo!)
I stamped some snowflakes in Cherry Cobbler, Gumball green and heat embossed some gold ones.  I added a greeting on a little banner (from the same set) and some pearls to finish it off.  I also used dimensionals to pop up the top layer to give it more of a punch!  Clean, quick, simple and I love it!  I can't wait to make some for of these in some other color combinations!
 
Thanks for stopping by today!


Wednesday, November 27, 2013

Lovely Winter Trees

Wow!  I am on a roll and I MUST keep this up!   This is 3 posts this week! 

Today I am sharing a simple card I created for my Christmas card club.  It is much prettier in person but I really wanted to share it.

I masked off the edges of the vanilla paper, leaving a rectangle in the center.  I sponged it with Pistachio Pudding ink.  I then inked up  the evergreen (from the Lovely as a Tree stamp set) with Always Artichoke and colored the trunk with an Early Espresso marker.  While leaving the mask on, I stamped the tree twice (one is darker and the other faint as I didn't re-ink it).  Then I repeated that step.  After I removed the mask, I inked the stamp a final time and stamped the full tree.  I added a greeting from the Joy To the World set and finally some Dazzling Diamonds to finish it off.

Thanks for stopping by!

Tuesday, November 26, 2013

Quick and Easy Christmas Card!

I absolutely love the colors on this Christmas card!  It comes from a kit called Merry Little Christmas Simply Created kit.  I paired it with the Merry Little Christmas stamp set to create the cards that Stampin' Up! has in their Holiday Catalogue. 
 
 
I love the colors in this card as well as how easy it was to create!  The kit comes with enough pieces (that are all pre-cut and scored I might add!) to make 8 cards!  This is a great card to mass produce for the holiday season. 
 
The only extra thing I added to this card (just to step it up a bit) was to add some Dazzling Diamonds glitter to the odd white stripes on the designer paper.  I love glitz for the holidays and I think it really adds to this card!
 
Thanks for stopping by!


Monday, November 25, 2013

Santa's List


Can you believe it is only 1 month until Christmas??  Wow!  Where does the time go?!  I started my Christmas cards over a month ago and I am sure glad that I did! 
 
Today I want to share a Christmas card I created for one of my Christmas classes using the Santa's List stamp set.  I love this image!  He looks like a Santa I had on a puzzle or a story book that I had as a child and it makes me smile every time I use it. 
 
I embossed the card with Stylish Stripes Embossing Folder (in the holiday catalogue).  I stamped Santa with black Staz On ink and colored him with markers.  I then die cut him with the Oval Framelits along with another oval in Early Espresso.
 
I adhered them to the card and added some Dazzling Diamonds to the fur on his coat and hat.  It give it so much more life! 
The greeting was done with Espresso embossing powder and the More Merry Messages stamp set.  I punched it with the Designer Label punch and matted it with 2 more punches that I cut in half and adhered to the back.  The finishing touch was to add a knot of Cherry Cobbler Stitched Grosgrain Ribbon. 
 
I hope you enjoyed this bit of Christmas inspiration and that you will stop by again soon for some more Christmas ideas!


Wednesday, December 19, 2012

December Scrap Club Pages

Welcome Back!

Today I want to share the pages I created for my monthly scrapbook club.  We usually create a single page layout as well as a double page layout each month.


This month we did our holiday pages and they have lots of sparkle and shine on them!
 
 
This page uses glimmer paper, rhinestones, and  a cute metal frame from the holiday mini catalogue.
I stamped 2011 on mine because I still need to scrap last year's Christmas pictures!  I never seem to keep up on my scrapbooking and I am sure some of you scrappers feel the same way!
 
This double page was a simple way to incorporate lots of photos because if you are like me, you take tons over the holiday season.  My scrap ladies all die cut their own titles to customize their page and they turned out really well! 
 
 
My favorite part of this page is the stamped snowflakes in the background.  I used Stampin' Up!'s new Illuminate Watermark Ink Pad.  It is GORGEOUS!!! It adds a watermark look with shimmer!  It is a really subtle but beautiful effect.  Here is a closer picture of part of my page that has this ink:
 
LOVE IT!!
 
I hope you are enjoying this Christmas season and are all ready for celebrating!  Stop in again soon!


Friday, December 14, 2012

Still need Card Ideas?

If you are like me, Christmas has crept up quickly and I am still making Christmas cards to get out to my family, friends and customers!  Here are a few of the ones I created for a class last month.  I used the Holiday Ornaments Framelits (#127816) and matching stamps (#128051).  I also decided to try the Candelight Christmas Designer paper (#126901).  These items are all available in the Holiday Catalogue until January 2.


Here are some close up shots of the treat container (made with the flocked window sheet in the designer paper pack-so lovely and velvety!!)


...and the cards...


Now, on to more cards...

 I created these with the Snow Festival Tags (#128152) from the Holiday catalogue.  They come with 25 in a package and are all double sided for double the fun (sounds like the old Doublemint gum jingle :)

These are quick and easy cards and I will be making lots more before the Christmas Season ends!


Thanks for stopping by.  I hope I inspired you to create a Christmas card today!


Wednesday, December 12, 2012

Advent Calendar

I love creating home decor items for the holidays and last year I created a fun, reusable muffin tin advent calendar.   My kids helped me hang it again this December and are excited every morning to see what is hiding under today's number!

This is our advent calendar that I made in 2011. 


 I had some customers request these this year so we recreated another version of mine this year using Early Espresso, Pool Party Cherry Cobbler, Whisper White, and Gumball Green.  We punched magnet sheets and carstock to make the covers for the mini muffin tins.  Then we embellished each day with punches, stamps, die cuts, ribbon and rhinestones.  Each scallop circle covers a hole for days 1-24 in December.  Now it just needs the ribbon hanger and it is ready to go!


I have fun hiding candy, mini erasers, Silly Bandz, coins, notes, "tickets" for activities and other little toys under each day.  I really love that it is reusable too!  My kids definitely enjoy this advent calendar tradition!

Quick Tip:  If you are creating one, make sure your muffin tin is magnetic before you purchase it!

Thanks for stopping by!

Adorable Glittery Ornaments

Welcome back! 

Well, the Christmas Season is in full swing and I have been busy creating cards, gifts, gift boxes, treats, home decor, and other fun decorations.

 Today I thought I would share share some of the cute, glittery ornaments I created for a class and then made with my kids.  I CASED these from my sister-in-law, Alanna Wharf (www.sleeplessstamper.com).

     1.   To create these ornaments, pour in some floor wax with minwax or Future Shine (I used   Pledge) into a glass ornament. 

2.  Slowly turn the ornament so the entire surface inside gets coated with the wax.  Pour out the excess. 

3.  Using a funnel, add in some extra fine glitter and swirl it around to coat the inside.  Again, pour out the excess. 

4.  Pop the top on and decorate!  It is that easy and you get a huge impact for little effort (my kind of crafting!)

 Here are the characters we created:


All of our punched pieces were attached with Glue dots.  We added Stampin' Up! ribbon to hang them on our tree.  They are super cute and easy enough that my 3& 5 year olds were each able to create one with minimal help. 
 
Hope you like them!  Check back soon for some more fun ideas!


Wednesday, November 28, 2012

Snowflake Soiree One Sheet Wonder


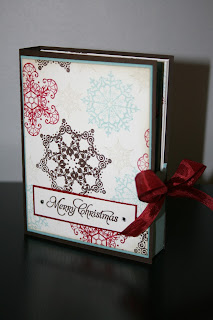
My Snowflake Soiree Stationary Set


This is the card box inside.  It holds 6 embellished cards and envelopes.
 
Welcome back!  Today I want to share with you a  stationary set that features a one sheet wonder technique.  I used my favorite stamp set from the Stampin' Up! Holiday Mini Catalogue called "Snowflake Soiree" (item # 127925).
  I stamped an 8 1/2 x 11 sheet of Whisper White cardstock with the various sizes of snowflakes.  I spritzed it with homemade shimmer spray to give it a frosty sheen.  I then went ahead and cut up my sheet and created 6 cards, a matching box and stamped envelopes to coordinate with the set.  To embellish the cards, I used Cherry Cobbler seam binding ribbon, basic rhinestones, and the Snowflurries die to create the die cut snowflakes.
 
 
This was a really fun project to put together and I was pleased with the final result!  Hope you like it!
 
I am off to create some fun holiday home decor items and will try to post them when they are done.
 
Happy Crafting!